Carp Fishing Rigs - A guide to carp rigs

How to tie the Multi Rig - in twelve steps
There can be little doubt of the qualities the Multi Rig possess, Here we show you how to tie it. On the whole most use it with a Chod hook but it can be tied with our Curve shank pattern too. In this article we've used one of our size 5 Duropoint Chod hooks
What you'll need to tie the Multi rig:
Some coated braid, we prefer a Soft or Semi stiff coated version. One of Our Chod hooks along with one of our Bait attachments, We'll be using a Rig ring screw but you can also use a Micro hook ring swivel or Rig ring. You'll also need some tungsten putty or Split shot too.
Tools for the job:
Scissors, Coated braid stripper tool, Knot puller and a lighter.
STEP ONE: Take a length of your chosen coated braid. 12 inches is a good staring length, double over a 60mm Length at the end as shown below.
STEP TWO: Now make an overhand loop with the doubled over section.
STEP THREE: Start to tighten the overhand loop knot, ease it down so that the resulting loop Is between an Inch to an Inch and a half in length. Now use a knot puller tool and bed it down.
STEP FOUR: Using a lighter set on a low flame, slowly melt the tag end until its just about at the knot. wet your thumb and use it to blob the remaining molten tag end against the knot.
STEP FIVE: Using your Coated braid stripping tool, carefully strip back around 10mm of coating behind the knot of the overhand loop.
STEP SIX: Take your chosen hook and hold it firmly between your thumb and forefinger
STEP SEVEN: Push the loop through the eye of the hook so that it exits at the back.
STEP EIGHT: Choose your bait mounting and feed this onto the loop too.
Rig ring screws are extremely convenient and make changing baits very easy. Micro hook ring swivels offer unparalleled hookbait movement.
STEP NINE: Holding your hook by the eye, pass the end of the loop over the bend and then the point of the hook until it's on the inside of the bend.
STEP TEN: Gripping the hook securely pull the the loop back through the eye until you're left with a small "D" section.
STEP ELEVEN: It’s now time to add some putty, we find it best to apply it to the knot as it offers good purchase helping the putty to adhere. Roll the required amount of putty into a ball, then flatten the ball between your thumb and forefinger. Now press the loop knot into the putty as shown below before wrapping the putty around the knot and shaping it.
STEP TWELVE: Tie your rig to the appropriate swivel for the lead arrangement you will be using, add your bait and away you go.
How to tie the Ronnie rig - In Eight steps
The Ronnie rig or Spinner rig as it is otherwise known has rather shot into the Spotlight recently and has become enormously popular, Its a great choice of Carp rig for those seeking a Subtle low sitting pop up rig that shares properties of both the Stiff hinged rig and the 360 rig but without the suggested drawbacks of the latter.
What you'll need to tie the Ronnie rig:
Some coated braid, Fluorocarbon or even Bristle filament for very clear lakebeds. One of our Duropoint® Curve shank hooks along with one of our bait attachments, we'll be using a micro hook ring swivel but you can also use a rig ring screw or rig ring. You'll also need some of Our trans Khaki or Green shrink tube, a shank stop and some tungsten putty.
Tools for the job:
Scissors, Knot puller and a lighter.
STEP ONE: Cut a length of our Trans Khaki Super shrink, If you're using a Size 4 or 6 Duropoint Curve shank 13mm is perfect. Slip the piece of Shrink tubing over the eye of your hook and onto the shank like so.
STEP TWO: Take one of our Size 11 Quick Change Heli ring swivels and put it through the eye of the hook. This can be quite tricky, to make it easier open up the gap through which the hook must pass a tiny (and I do mean tiny) amount. It is vitally important to note that the outward angled part of the Swivel is to the back of the hook as shown below!
STEP THREE: Slide the shrink tubing back so that it covers most of the body of the swivel whilst still covering the eye of the hook and extending a couple of millimetres u the shank Like so.
STEP FOUR: Being very careful not to burn your fingers, steam the shrink tube down to size. Whilst doing so, do try to keep the swivel inline with the eye of the hook, this will create a rig that sits perfectly. To keep it all lined up as desired whilst steaming hold the hook by the bend in your left hand and the ring of the Ring swivel in your right hand or with a knot puller tool. Note how to shrink tubing fully covers the eye of the hook and extends a couple of millimetres up the shank.
STEP FIVE: Take your chosen bait attachment and slip it over the hook point and onto the shank. We're using a Micro hook ring swivel as we feel they offer unparalleled hook bait movement which allows the rig to perform to its optimum.
STEP SIX: Take one of our neat little Shank stops and putting it on thick end first slide it over the point, carefully over the barb and round the bend until its about opposite the Barb of the hook. Adjusting the positioning of this bead will alter the way the rig sits in the water.
STEP SEVEN: Now attach your newly created Ronnie rig end section you your chosen hooklink material. We prefer to use a semi stiff coated braid for this, But you should obviously make your choice based on the laked bed you will be fishing the rig over. Here we tie the Ronnie rig end to the hooklink with a Three turn grinner knot. This also gives you something to apply your tungsten putty to.
STEP EIGHT: Trim and blob your tag end and attach your chosen hook bait to the Ronnie rig.
The only thing left is to apply some Tungsten putty to the knot attaching your hook link to the End section of your Ronnie Rig. We believe that this rig performs best when slightly overweighted.
The Ronnie rig, underwater, poised and ready for a take. Perfect..
Side note: You may see other versions of this rig where the Shrink tube does not extend onto the body of the swivel. The suggested reason for this being that it is believed to offer better movement, however and it's a big however in our eyes it leaves the Crook of the swivel with more potential to become caught up in the net should the shrink tube move or bend slightly.
Get all your Ronnie rig components, including our wickedly sharp Duropoint Curve shank hooks in one convenient kit by clicking here
How to tie the Chod rig - In fourteen steps
What hasn't been said about the Chod rig, isn't worth mentioning. Used in the right situation it is an incredibly effective rig. When bites are hard to come by a rig that can be cast a long way and which is very unlikely to tangle can be a real benefit. A great method for presenting a single hookbait at distance or over a spread of boilie. Here we show our way of tying them.
What you'll need to tie the Chod rig:
A spool of REVOLVE™ Stiff rig bristle filament, Duropoint® Chod hooks along with one of our Bait attachments, We'll be using a Micro hook ring swivel but you can also use a hook ring swivel screw, rig ring screw or Rig ring.
Tools for the job:
Scissors, Knot puller x 2 and a lighter.
STEP ONE: Take a 7 inch length of bristle filament & one of our Chod hooks, a Size 5 is perfect for 14/15mm popups pass the bristle filament through the eye so that there is around 40mm at the back of the hook.
STEP TWO: Clamping the 40mm length of B/F along the back edge of the shank of the hook with your Left hand( if you're right handed) use your right hand to start whipping the B/F up the shank of the hook going anti clockwise.
STEP THREE: For a Size 5 hook we recommend whipping up the shank around 8 or 9 times, For a size 6 hook, 7 or 8 and for a size 8 hook 6 or 7 times
STEP FOUR: Carefully adjust your grip to pinch the whipping you have just completed to prevent it unravelling. Now pass the long length of Bristle filament through the eye from back to front. Pull it all the way through then use your knot puller tool to tighten
STEP FIVE: Thread the Micro hook ring swivel onto the line at the back of the hook
STEP SIX: Now take the end of the line onto which you have just slid the micro hook ring swivel and pass it back through the eye from back to front. Pull it right the way through so that the "D" Is closed right up then trim the line where it exits the eye to about 5mm long.
STEP SEVEN: Using your lighter carefully light the tag end that you have just created and flatten it with your thumb before it reaches the eye of the hook, it may help to bend the rest of the line out of the way before you do so. With this done grab the micro ring swivel and use it to pull to "D" into shape.
STEP EIGHT: Take the remaining length of bristle filament and double it over, we're looking for the fold to be around 35mm from the eye for a short Chod rig and 45mm for a longer one.
STEP NINE: Pass one of our Size 11 ring swivels onto the bristle filament and down to the fold you have just created.
STEP TEN: Now we're going to create an overhand loop, Hold the hook and hooklink with your right hand and form a loop in the doubled over hooklink. Now pass the ring swivel through the loop.
STEP ELEVEN: Tease the knot down until it is close to the swivel before tightening it down with two knot pullers, again whilst trying to ensure the loop stays fairly small.
STEP TWELVE: Trim the tag end down to about 5/6mm. Bend the bristle filament out of the way and carefully blob the tag end with your lighter.
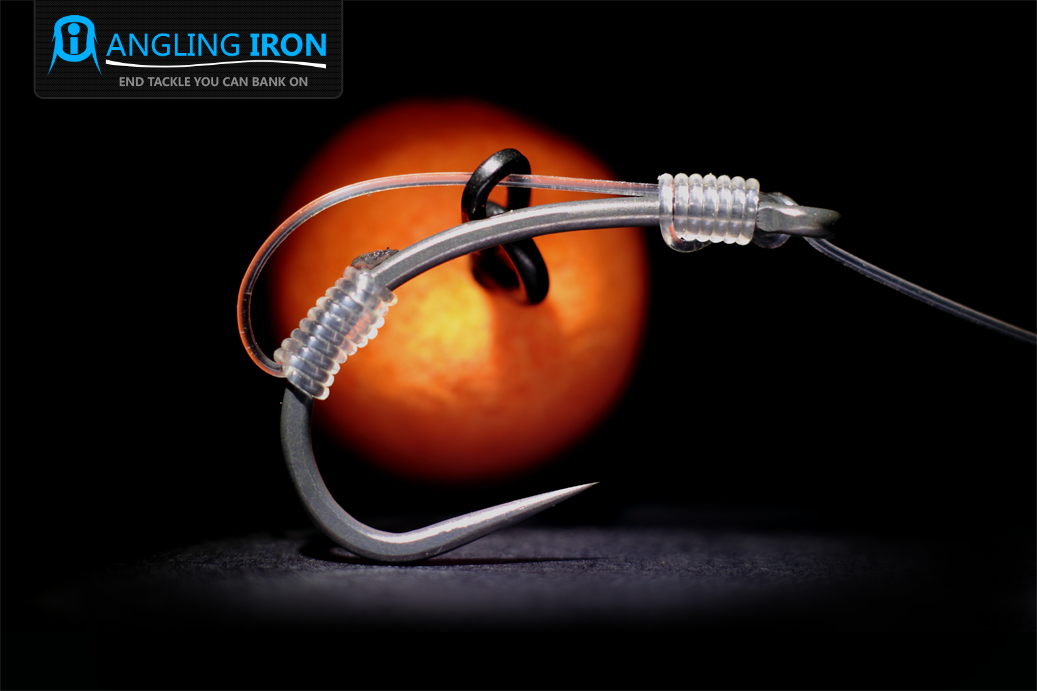
STEP THIRTEEN: Now steam your Chod rig into shape or form it between your thumb and fingers. We're looking to create a slight curve like the one pictured below.
STEP FOURTEEN: Your Chod rig is almost finished, but one little adjustment to make an improvement to the way the rig perfoms, We want to open up to loop attaching the rig to the swivel, this attention to detail makes the rig perform much more effectively by allowing extra movement.
Side note: Many anglers like to use rig putty over the swivel and the knot where we have created the loop, this does work however in our opinion this restricts the Chod rig from working as well as is possible, it can also make the rig sit awkwardly. We much prefer to use the weight of the leader and or beads to counter the buoyancy of the Popup, If using a naked chod rig, then make the rig sink slowly by using a smaller popup or perhaps a size 8 ring swivel instead of a size 11. What we want to achieve is a Chod rig that sinks very slowly and comes to rest lightly over any weed or debris on the lakebed.
If you're short of time we supply ready tied Chod rigs - Hand tied in the UK to the highest standard you're likely to find. Click here to buy some
The Ronnie Rig - Also called the Spinner Rig - Carp rigs by Angling Iron
The Ronnie rig or Spinner rig as it is otherwise known
Just who Ronnie is we're not sure, One thing we do know is the Ronnie or Spinner Rig as it is also known, Is a superbly effective rig for Big carp. When blatant high pop up rigs like the Hinged stiff rig or Chod rig just won't do and a popup rig presented much lower is required the Ronnie Rig really comes into its own.
Similar to the well known big fish catcher the 360 Rig in both principle and Mechanics the Ronnie rig comes with none of the apparent risks to fish safety.
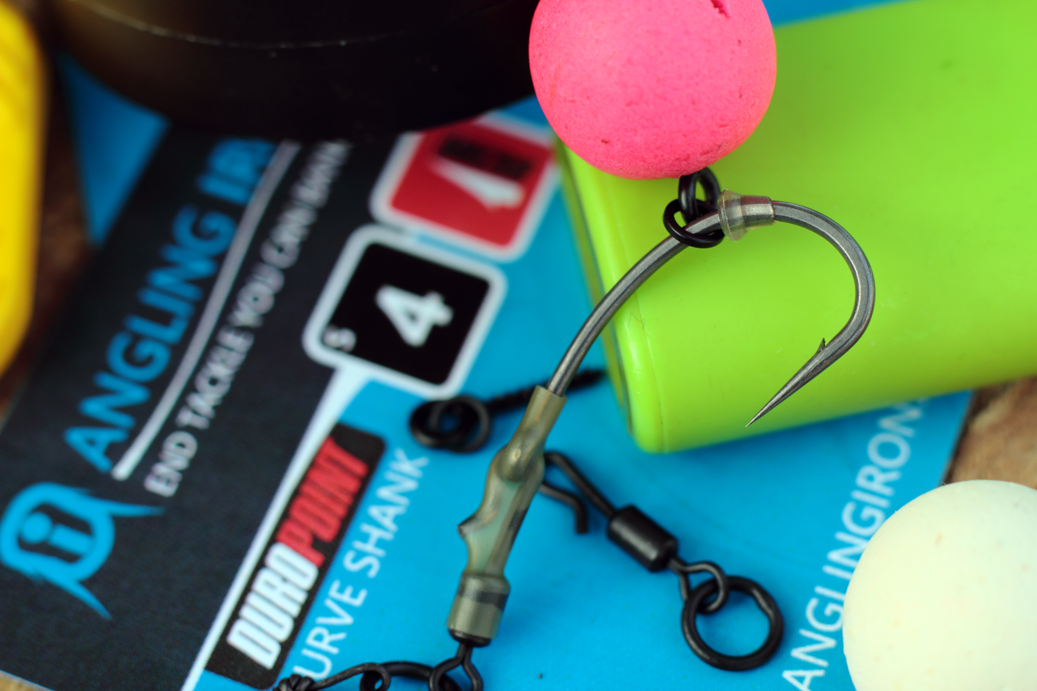
Best used over relatively clean lakebeds this Big carp rig is ideal where a bit more subtlety is required. Quick and easy to tie it is better suited to use with a larger hook, Our Duropoint Curve shank in either a Size 4 or 6 is ideal. The beauty of these is that unlike other Curve shank hooks on the maket the gape is not restricted by an inturned eye.
What else do you need; A pack of our Size 11 Quick Change Heli swivels, a pack of our Round rig ring screws or Micro hook ring swivels (on which to mount the bait) A pack of Our Blend Shank stops and Some of our Translucent Khaki or Green Shrink tube in 3:1mm Size.
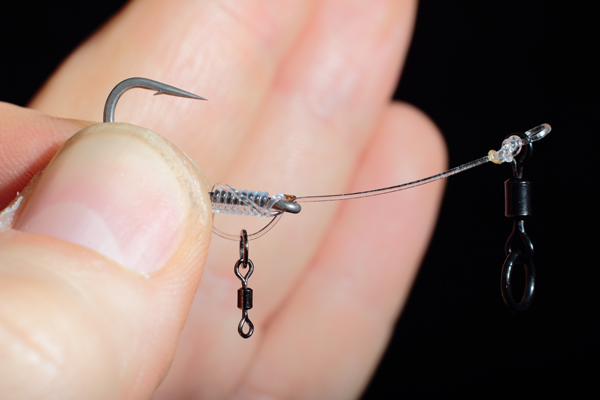
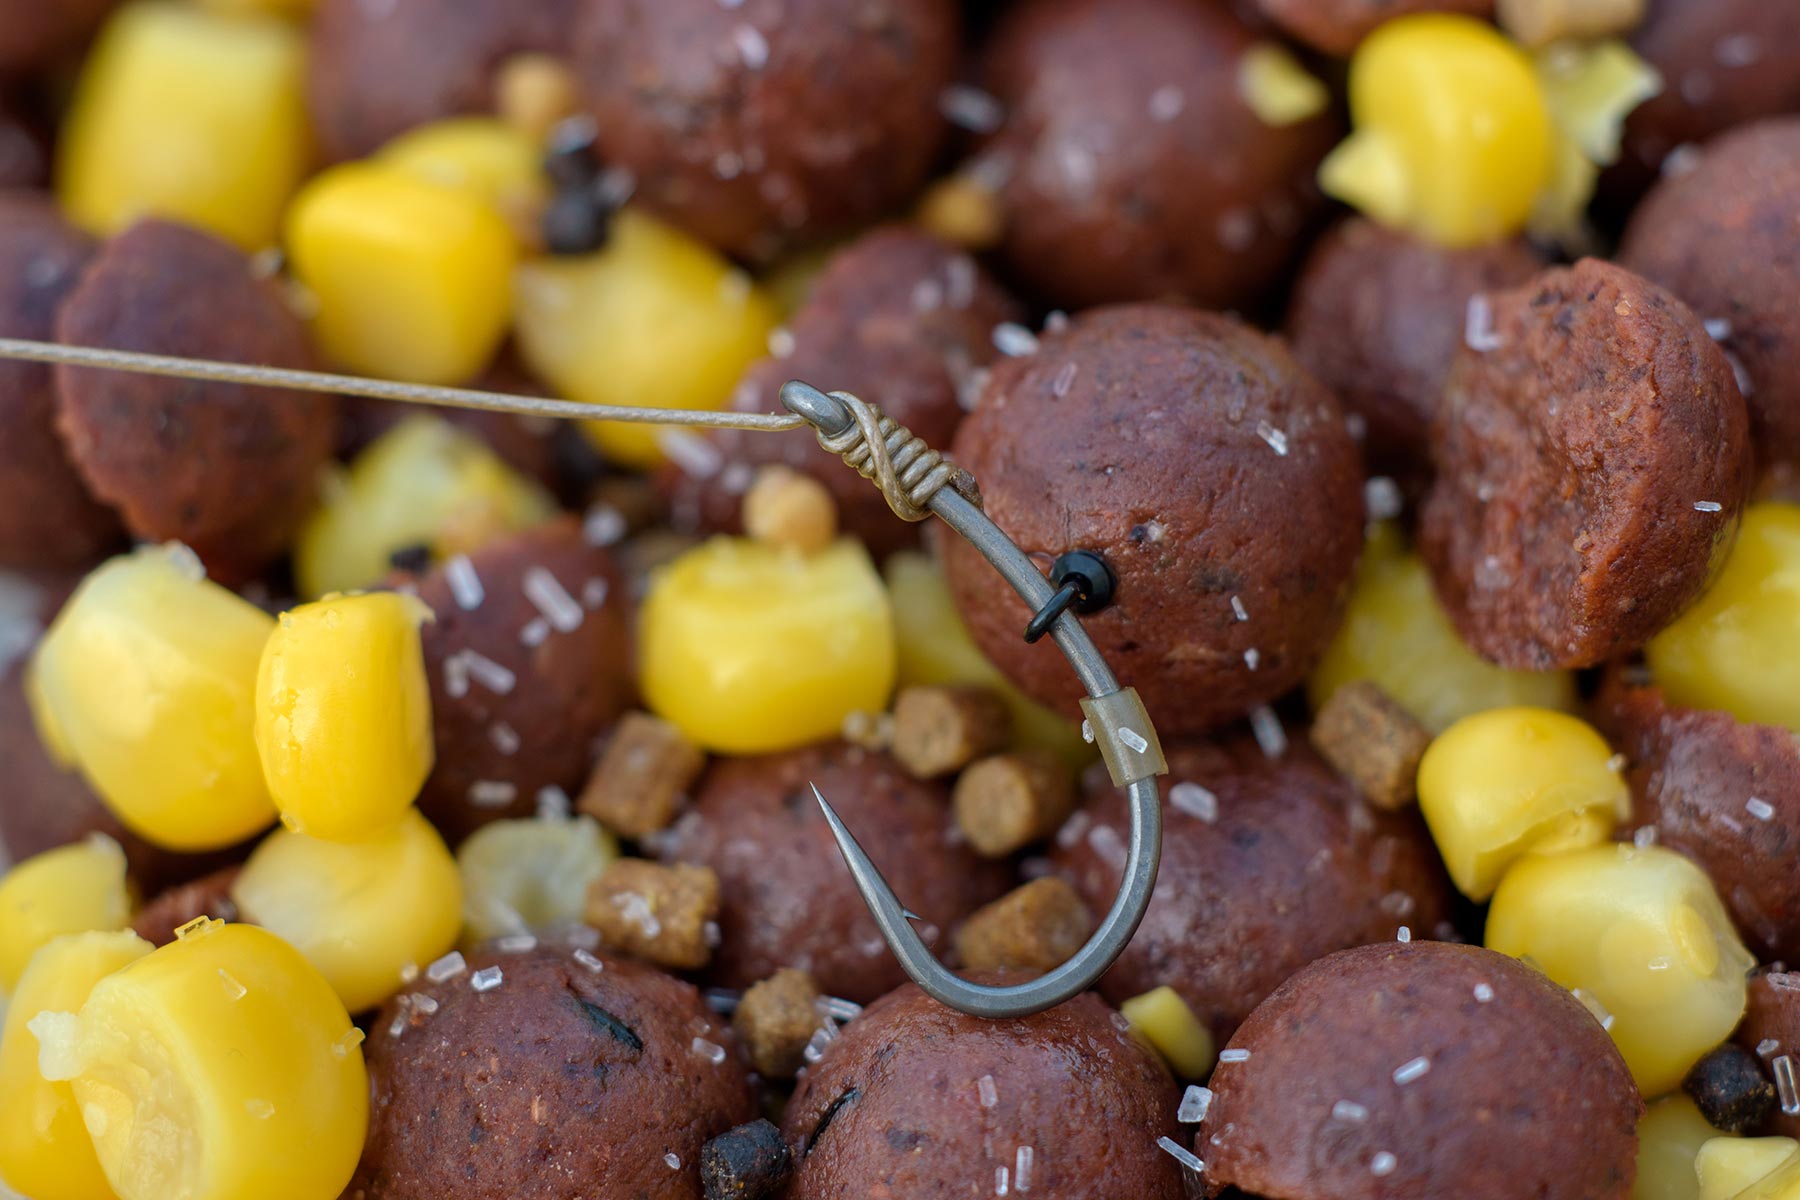
Sitting pretty: The Ronnie rig sits poised ready for a bite, a Size 4 Duropoint Curve shank hook balances a 14mm popup perfectly with Little or no Rig putty required.
Want to see how to tie the Ronnie rig then CLICK HERE
Get all your Ronnie rig components, including our wickedly sharp Duropoint Curve shank hooks in one convenient kit by clicking here.
The Multi Rig - Carp rigs by Angling Iron
A creation of Mr Mike Kavanagh, The Multi rig is a superbly effective and versatile rig. Not only is it a fantastic carp catcher but its also incredibly simple to tie, essentially it consists of a length of coated braid with an overhand loop of around an inch to an inch and a half tied at the hook end, the coating of the braid is then stripped back slightly behind the knot. This enables to last inch or so to rotate freely as a carp sucks at the bait.
These days many anglers opt to change their rig after landing a fish or two. Rather than having to change the entire rig over the multi rig enables the angler to change just the hook, and quickly too. An added benefit of this is that the hookbait can be changed equally as easily, this is a fantastic feature of the rig and makes it one of the best.
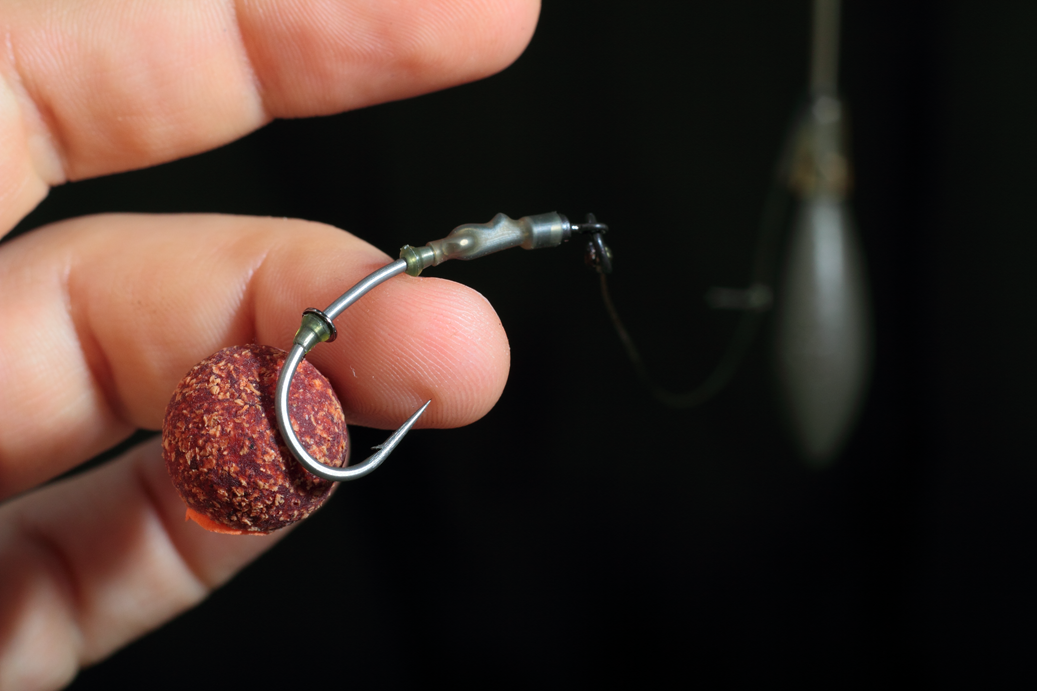
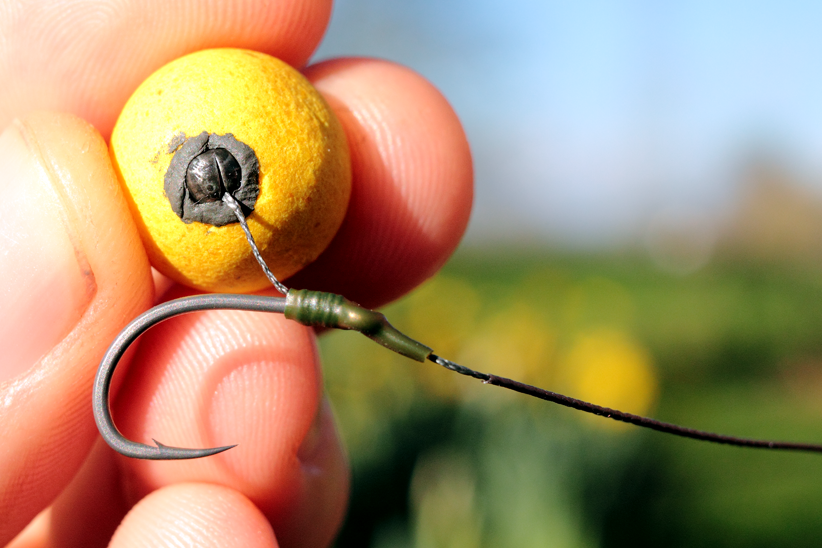
Replacing the Hook and or Hookbait easily after landing fish or if the point becomes damaged is a real benefit offered by the Multi Rig.
Changing the Hook and hookbait is painless, simply pull the Duropoint Chod hook towards the Knot and begin to ease the Loop off the hook. It's much simpler to do in practice than to explain in words and takes a matter of seconds.
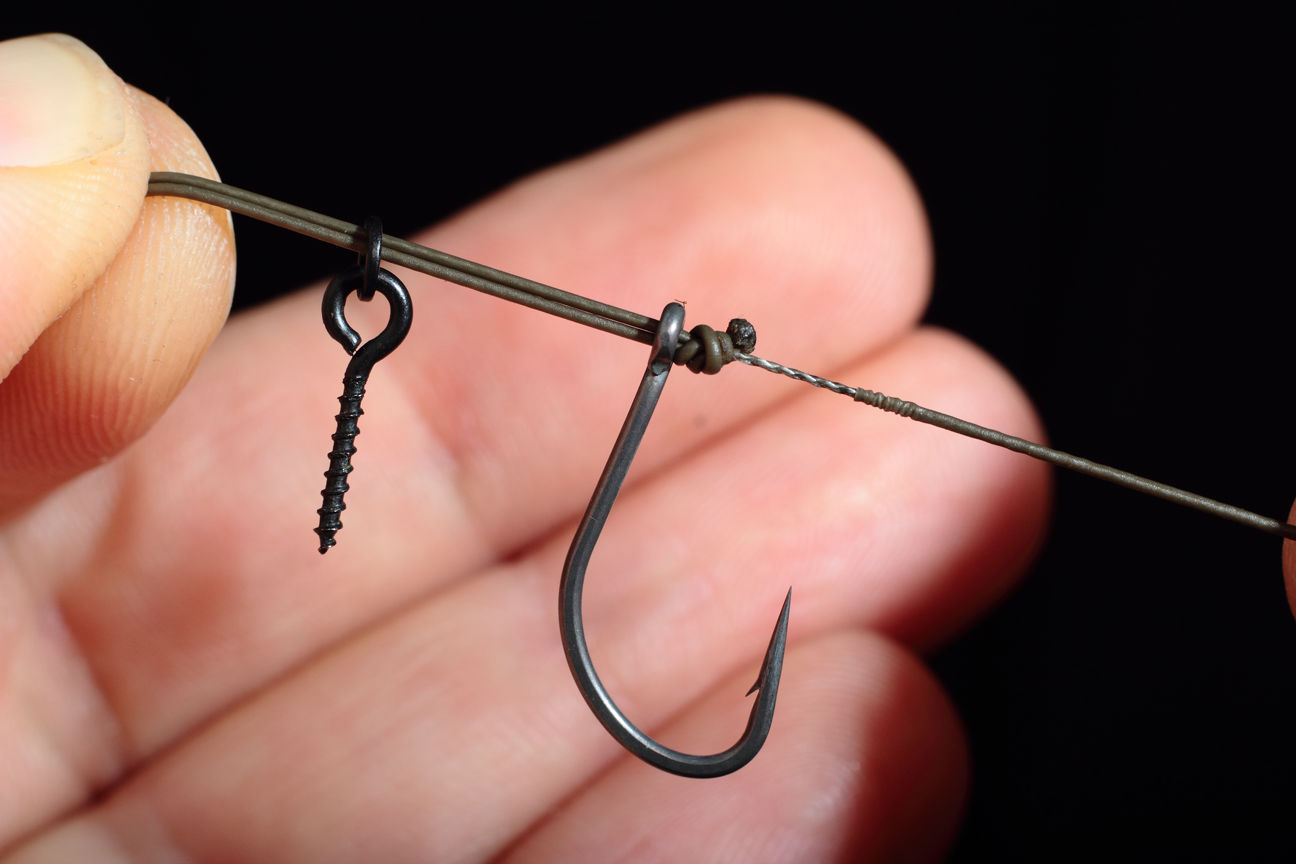
With the loop now released from the shank of the Chod hook simply replace your hookbait and Hook if you deem it necessary.
Hook changed and a different hookbait too, now its just a case of popping the loop back over the hookpoint and back into position along the shank.
Pull the loop back throught the eye of the hook until its around half way along the shank and in literally no time at all its ready to cast back out infront of those hungry Carp.
Side note: Many worry that the "D" will close up on the cast. On the whole this is not the case, if the "D" is closed when reeling in it's often occurred as the rig gets dragged back through weed etc. However for piece of mind just use a little piece of our Trans Khaki shrink tube over the eye of the hook, This will trap the line so you needn't worry anymore. The shrink tube will pop off easily enough for the rig to retain its ability to have the hook and hookbait changed easily.
At this point I think its worth mentioning that many anglers use the Multi rig with popups and popups alone, this is great and it works fantastically well as a popup rig but what a lot don't do is use it with bottom baits and that's a shame because it is equally as effective a hooker with a wafter or boilie straight out of the bag. To Optimise the rig for use with a bottom bait simply pull more of the loop throught the eye of the hook so that the "D" section extends further along the shank.
If you want to see a detailed guide on how to tie the Multi rig from the beginning then click here

The Multi Rig - Carp rigs by Angling Iron
A creation of Mr Mike Kavanagh, The Multi rig is a superbly effective and versatile rig. Not only is it a fantastic carp catcher but its also incredibly simple to tie, essentially it consists of a length of coated braid with an overhand loop of around an inch to an inch and a half tied at the hook end, the coating of the braid is then stripped back slightly behind the knot. This enables to last inch or so to rotate freely as a carp sucks at the bait.
These days many anglers opt to change their rig after landing a fish or two. Rather than having to change the entire rig over the multi rig enables the angler to change just the hook, and quickly too. An added benefit of this is that the hookbait can be changed equally as easily, this is a fantastic feature of the rig and makes it one of the best.
Replacing the Hook and or Hookbait easily after landing fish or if the point becomes damaged is a real benefit offered by the Multi Rig.
Changing the Hook and hookbait is painless, simply pull the Duropoint Chod hook towards the Knot and begin to ease the Loop off the hook. It's much simpler to do in practice than to explain in words and takes a matter of seconds.
With the loop now released from the shank of the Chod hook simply replace your hookbait and Hook if you deem it necessary.
Hook changed and a different hookbait too, now its just a case of popping the loop back over the hookpoint and back into position along the shank.
Pull the loop back throught the eye of the hook until its around half way along the shank and in literally no time at all its ready to cast back out infront of those hungry Carp.
Side note: Many worry that the "D" will close up on the cast. On the whole this is not the case, if the "D" is closed when reeling in it's often occurred as the rig gets dragged back through weed etc. However for piece of mind just use a little piece of our Trans Khaki shrink tube over the eye of the hook, This will trap the line so you needn't worry anymore. The shrink tube will pop off easily enough for the rig to retain its ability to have the hook and hookbait changed easily.
At this point I think its worth mentioning that many anglers use the Multi rig with popups and popups alone, this is great and it works fantastically well as a popup rig but what a lot don't do is use it with bottom baits and that's a shame because it is equally as effective a hooker with a wafter or boilie straight out of the bag. To Optimise the rig for use with a bottom bait simply pull more of the loop throught the eye of the hook so that the "D" section extends further along the shank.
If you want to see a detailed guide on how to tie the Multi rig from the beginning then click here
The German Rig - Carp rigs by Angling Iron
A Fantastic rig for use in a multitude of angling situations - it works similarly to the Widely used "D" rig but is much easier to tie.
Best used with Fluorocarbon but equally as effective with a coated braid this rig is made up with one of our Duropoint Curve shank hooks, our essentials Shank stops and micro hook ring swivel or alternatively with a length of our trans khkai silicone hook tube in place of a hook bead and Size 12 Mini rig swivel. (pictured above)