Carp Fishing Rigs - A guide to carp rigs
The Clone Rig
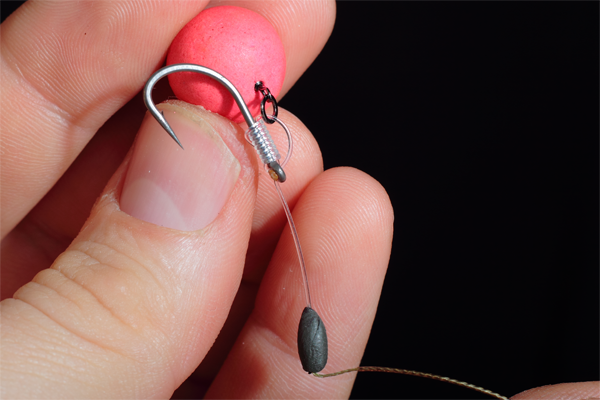
At its core The Clone Rig is nothing more complicated than a 'D' Rig and although simple to tie it can be an incredibly effective carp rig.
The Clone Rig can be tied with a number of hook link materials, though is perhaps best suited to use with one which has an inherent degree of stiffness. Monofilaments, Fluorocarbon, Bristle filaments and some Coated braids can all be used and should be chosen to suit the lakebed being fished over.
To accomodate the stiff hooklink materials it is best used with one of our Ultra sharp Duropoint® Chod hooks which feature an outurned eye. The outurned eye is important as stiff hook links have a habit of closing the effective gape when used with hooks that have inturned and inline eyes. If used with Fluorocarbon It also prevents a weak point being formed where the line exits the eye.
The Clone Rig uses a simple knotless knot and the 'D' onto which one of our range of bait mounting components is fed is created with the excess hooklink material that exits the end of the knotless knot.
Where The 'D' is passed through the eye it is secured by using a lighter to melt and blob the tag end.
Some hook link materials have memory and will try to return to their original form, meaning they can loosen themselves. This can be prevented by steaming a length of our 2.4mm Shrink tubing over the knotless knot before completing the rig.
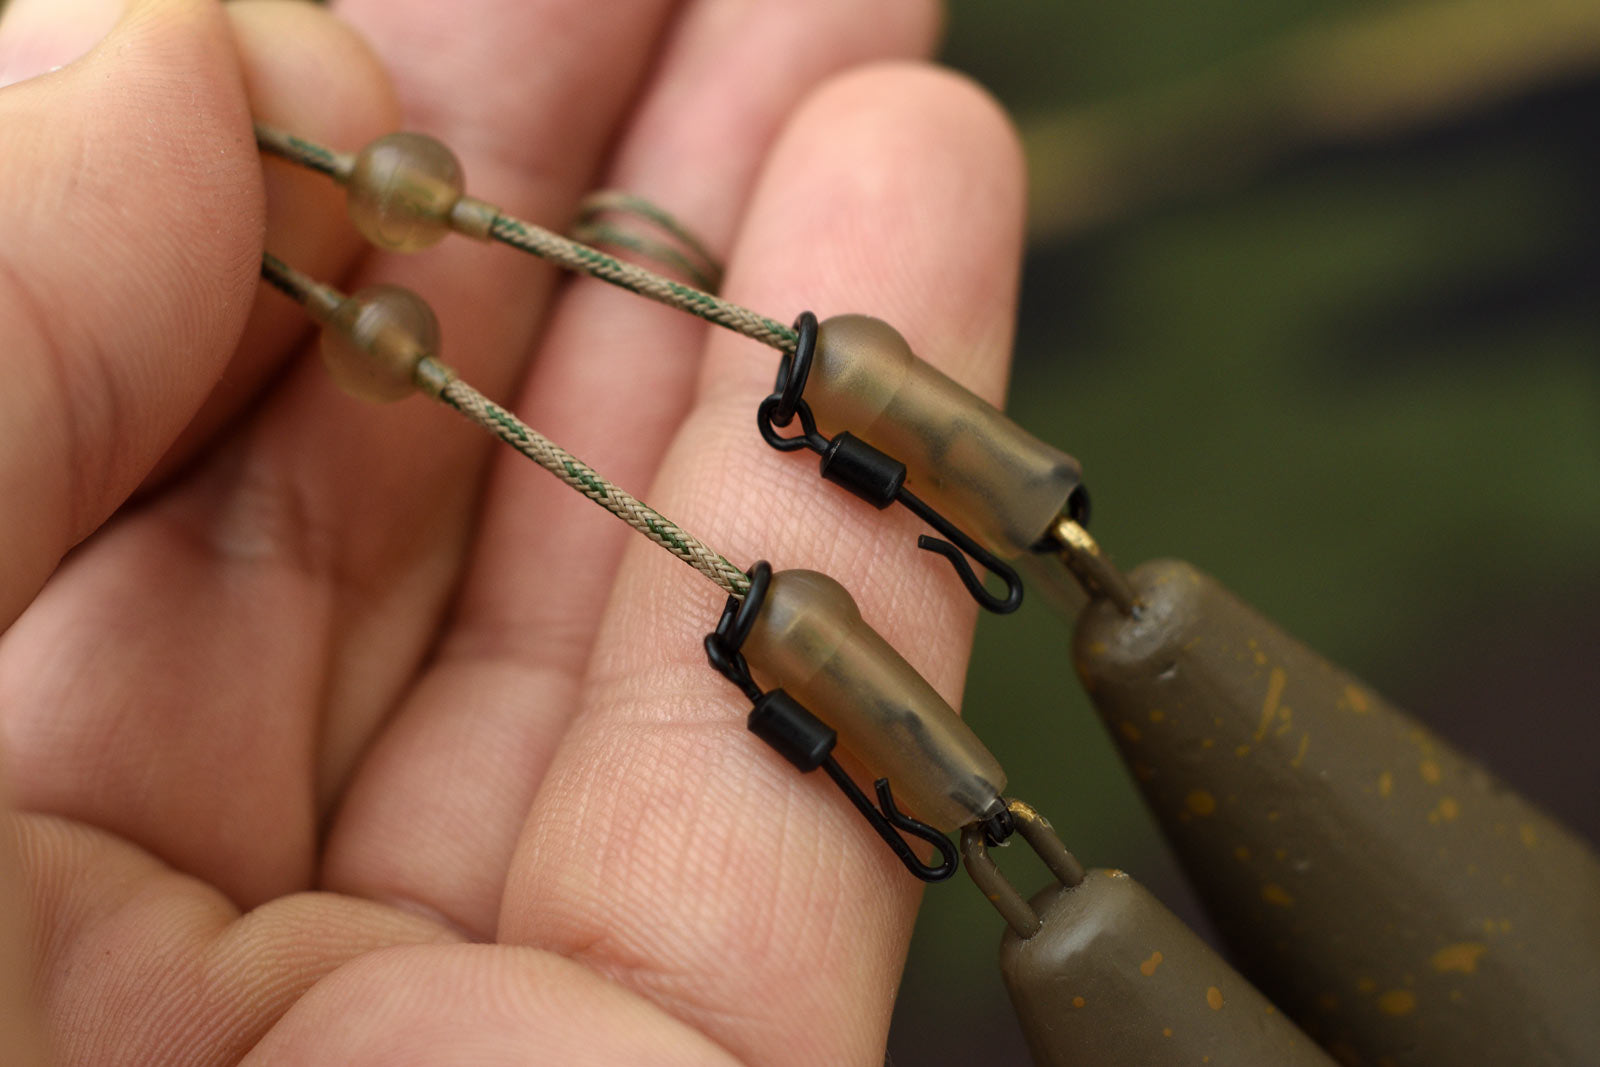
How to construct a Helicopter setup - With Lead free leader
A Helicopter lead setup is a great arrangement for reducing the likelihood of tangles on the cast. It is also, when used with a fixed lead, a safe arrangement should a breakage occur. Our Gravit8™ Leader is the perfect material for this setup being incredibly supple, dense, easy to splice and because of its diameter, carp friendly.
What you'll need to construct a helicopter leader:
A spool of Gravit8™ Lead free leader, a speed link or Q ring which your lead will attach to, Helicopter buffer bead, a size 11 QC or standard flexi ring swivel, Silicone leader tubing and a standard or Tungsten 6mm Tapered bore bead
Tools for the job:
Scissors, Knot puller and fine splicing needle.
STEP ONE: Cut a length of Gravit8™ Lead free leader material, Three foot is a good starting point. At one end fold over around 2 - 2.5 Inches. This will be the length of our splice.
STEP TWO: Compress the main length of leader at the point at which the folded section ends, this will open up the weave and increase the ease with which it can be spliced. keeping it perpendicular to the leader insert the splicing needle and gently work it through the inside until it reaches the fold line, now poke the needle back through to the outside.
STEP THREE: Slip a Speed link or Q ring onto the leader then trap the cut end in the gate latch of the splicing needle. With the latch closed retract the needle through the leader, using your index finger and thumb to manipulate the splice at the point the loop is formed will help to get it moving.
STEP FOUR: Once the the needle is back out, pull on the cut end until the loop is closed up tightly against the speed link. If needs be trim a little off the end then work the outer section of the splice over the inner section. once the tag end dissapears inside the leader give the splice a good pull with a knot puller tool to compress the splice.
STEP FIVE: At the other end of the leader slip a Heli buffer bead on and slide it all the way down to the speed link. Do the same with a size 11 Quick change Heli ring swivel or Flexi ring swivel (whichever you'd prefer to attach your rig to later).
STEP SIX: Now cut a small length of our ultra grippy Silicone Leader tubing, around 10 to 12mm will be ideal. Work it onto the splicing needle and then transfer it onto the leader and down towards to speed link.
STEP SEVEN: Take one of our 6mm Tapered bore beads, if you really want to pin down yor rig use the Tungsten variant. Now thread it onto the leader, note for fish safety it's important that the smaller hole is first with the larger hole following. Slide it down and locate it upon the section of Silicone tubing. Twisting the bead will help.
STEP EIGHT: Now at the opposite end of the leader create another splice following the same steps detailed at the beginning of the how to, but without a speed link. When bedding down the splice insert something into the loop to prevent it closing up. A knot puller is perfect for this.
NOTES: Position your silicone tubing and bead at a distance from the lead that is sufficient for your rig to settle on top of Silt or low lying weed, this could be anything from a couple of inches to a foot or more for deeper silt. Ensure that your bore bead can pass over the knot connecting your leader to mainline, this will be correct if you've threaded the bead on as detailed above.
RIG CHOICE: Because of the nature of the helicopter set up most rigs can be used with it. Rigs that utilise Semi stiff or Stiff hook link like our Revolve™ bristle filament are well suited to the helicopter with Hinged stiff rigs, Chod rigs, Ronnie and German rigs all being suitable choices.
A winter winner: Using maggots with the Horton rig
Maggots are a fantastic winter bait and the Horton rig is an excellent choice for presenting them on, particulalry when used in conjunction with a critically balanced bait or wafter. The reason the Horton rig is so good for use with maggots is that i allows them very little wirggling room which could ultimately lead to a tangled rig
What you'll need to tie the Horton Rig:
Some Semi stiff or Stiff coated braid. One of our Size 6 Duropoint Anchor hooks, a micro hook ring swivel or Rig ring screw if you'd prefer. And dependent upon which method you choose for attaching your maggots you'll also need some fine wire hooks.
Tools for the job:
Scissors, Knot puller, lighter, Rig glue or Pliers(method dependant)
STEP ONE: Cut a length of your chosen coated braid, 12 inches would be a good starting point. Remove around 95mm of the coating from one end.
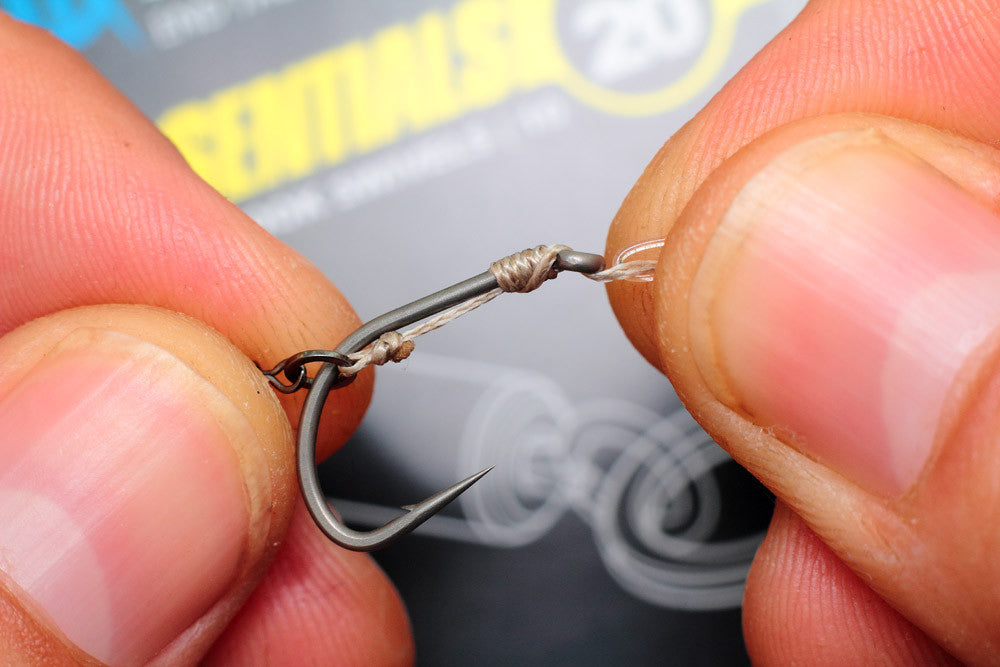
STEP TWO: Double over around an inch of the braid from which you have just removed the coating and feed on a micro hook ring swivel as pictured. Now feed both legs of the hook link through the back of the eye like so.
STEP THREE: adjust the doubled over section so that it ends in line with the middle of the hook point and hold it securely before whipping up the shank of the hook 8 to 9 times.
Pass the hooklink back through the back of the eye and tighten down the knot, at this point you should have around 10mm of bare braid exiting the eye of the hook. Trim the tag end and carefully blob the remainder with a lighter.
STEP FIVE: Next take around four inches of coated braid or bait floss, pass it through the micro hook ring swivel and double it over. Transfer your hook bait, in this case a 10mm wafter onto the doubled over section and locate on the micro hook ring swivel. Trim the tag ends and using a lighter, light blob them against the bait.
Now you have two methods of attaching your maggots to the hookbait, the first and most simple way is to use some rig glue, the second and perhaps more secure is to use a fine wire hook, which we'll detail later .
To attach your maggots with glue: Ensure both the hook bait and maggot are dry and free from dust. Apply a small amount of glue to the top of the hook bait on the blobbed hook link will be perfect. Take the maggot and press it firmly into the glue. Hold until glue has set, making sure you're finger isn't also glued in place!
To attach your maggots with a fine wired hook: Take your hook, a wide gaped fine wired hook will be perfect. Cut off the eye of the hook so that the shank is slightly shorter than the diameter of the boilie you're using.
Thread on two or three maggots a mix of colours, will work nicely. Ensure the maggots are positioned around where the shank turns into the bend of the hook.
Push the shank of the hook with the maggots on into the hookbait, adjust the position of the maggots as the hook goes further into the bait. Push the hook fully home ensuring that the point is completely embedded in your hook bait.
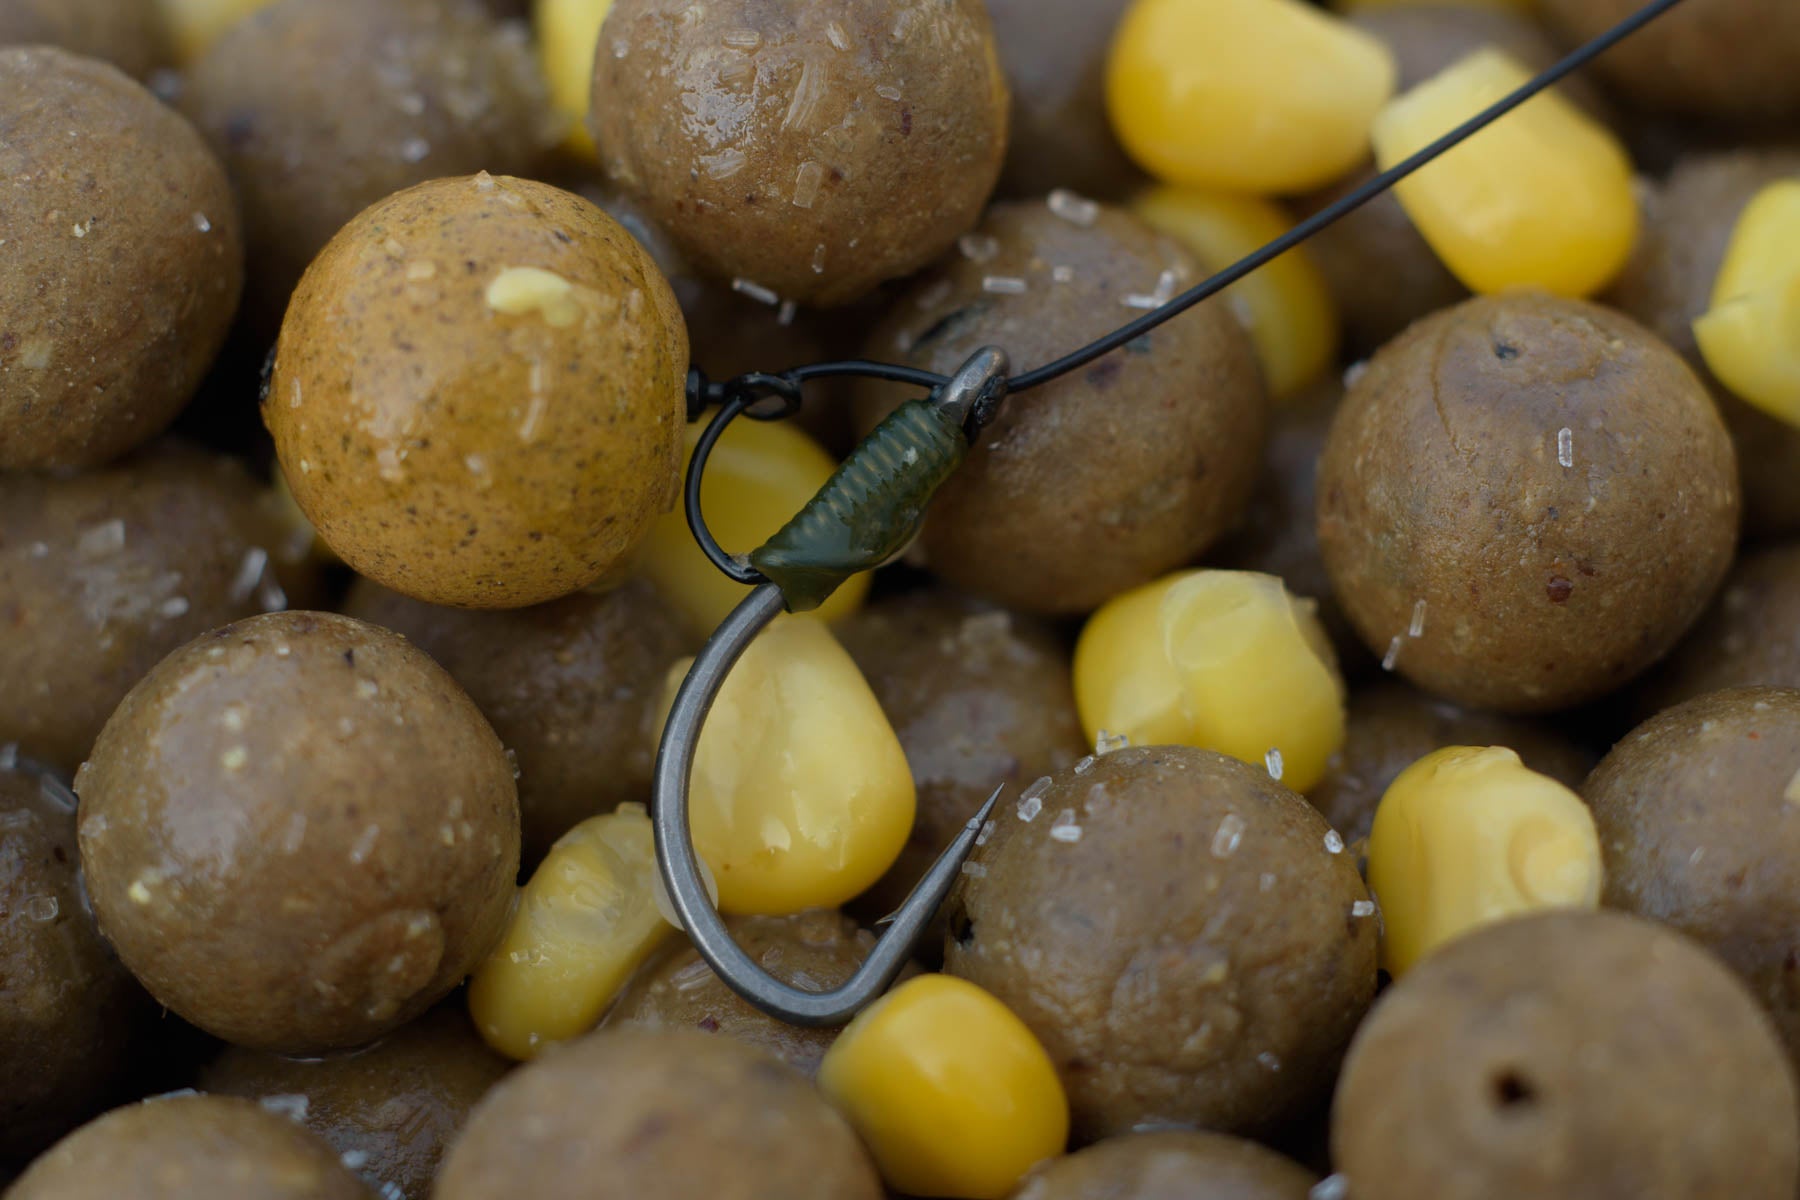
How to tie a balanced Tiger nut rig - Carp rigs by Angling Iron
There isn't a carp that swims that can resist the almighty allure of a big juicy Tiger nut!
As the spring rolls in those big old carp will begin moving into the margins with more and more frequency. theres no better way to elicit a bite in the edge than with a meticulously laid trap and a handful of Chuffa's.
A tiger Critically balanced with a slither of brightly coloured Zig Foam Is a deadly effective hookbait, not only does it offer something visual to home in on it also helps the bait to fly back into the mouth when inhaled by a big carp.
When fishing in close, Don't be afraid to use a big hook, the tigernut will be fluttering above helping to conceal it! A big hook is much more likely to grab hold and the thicker gauge steel will be beneficial in stopping a Big carp hooked just yards away in its bid for freedom.
What you'll need to tie our balanced tigernut rig:
Some supple braid, One of our Duropoint Curve shank hooks(we're using a size 4) along with one of our bait attachments, we'll be using a mini rig swivel but you can also use a micro hook rig swivel. You'll also need some of our shank stops, 6mm STICKUMUP zig foam and our 3:1 trans Khaki shrink tube or Large line aligners.
Tools for the job:
Scissors, Knot puller, lighter and a tub of water for balancing.
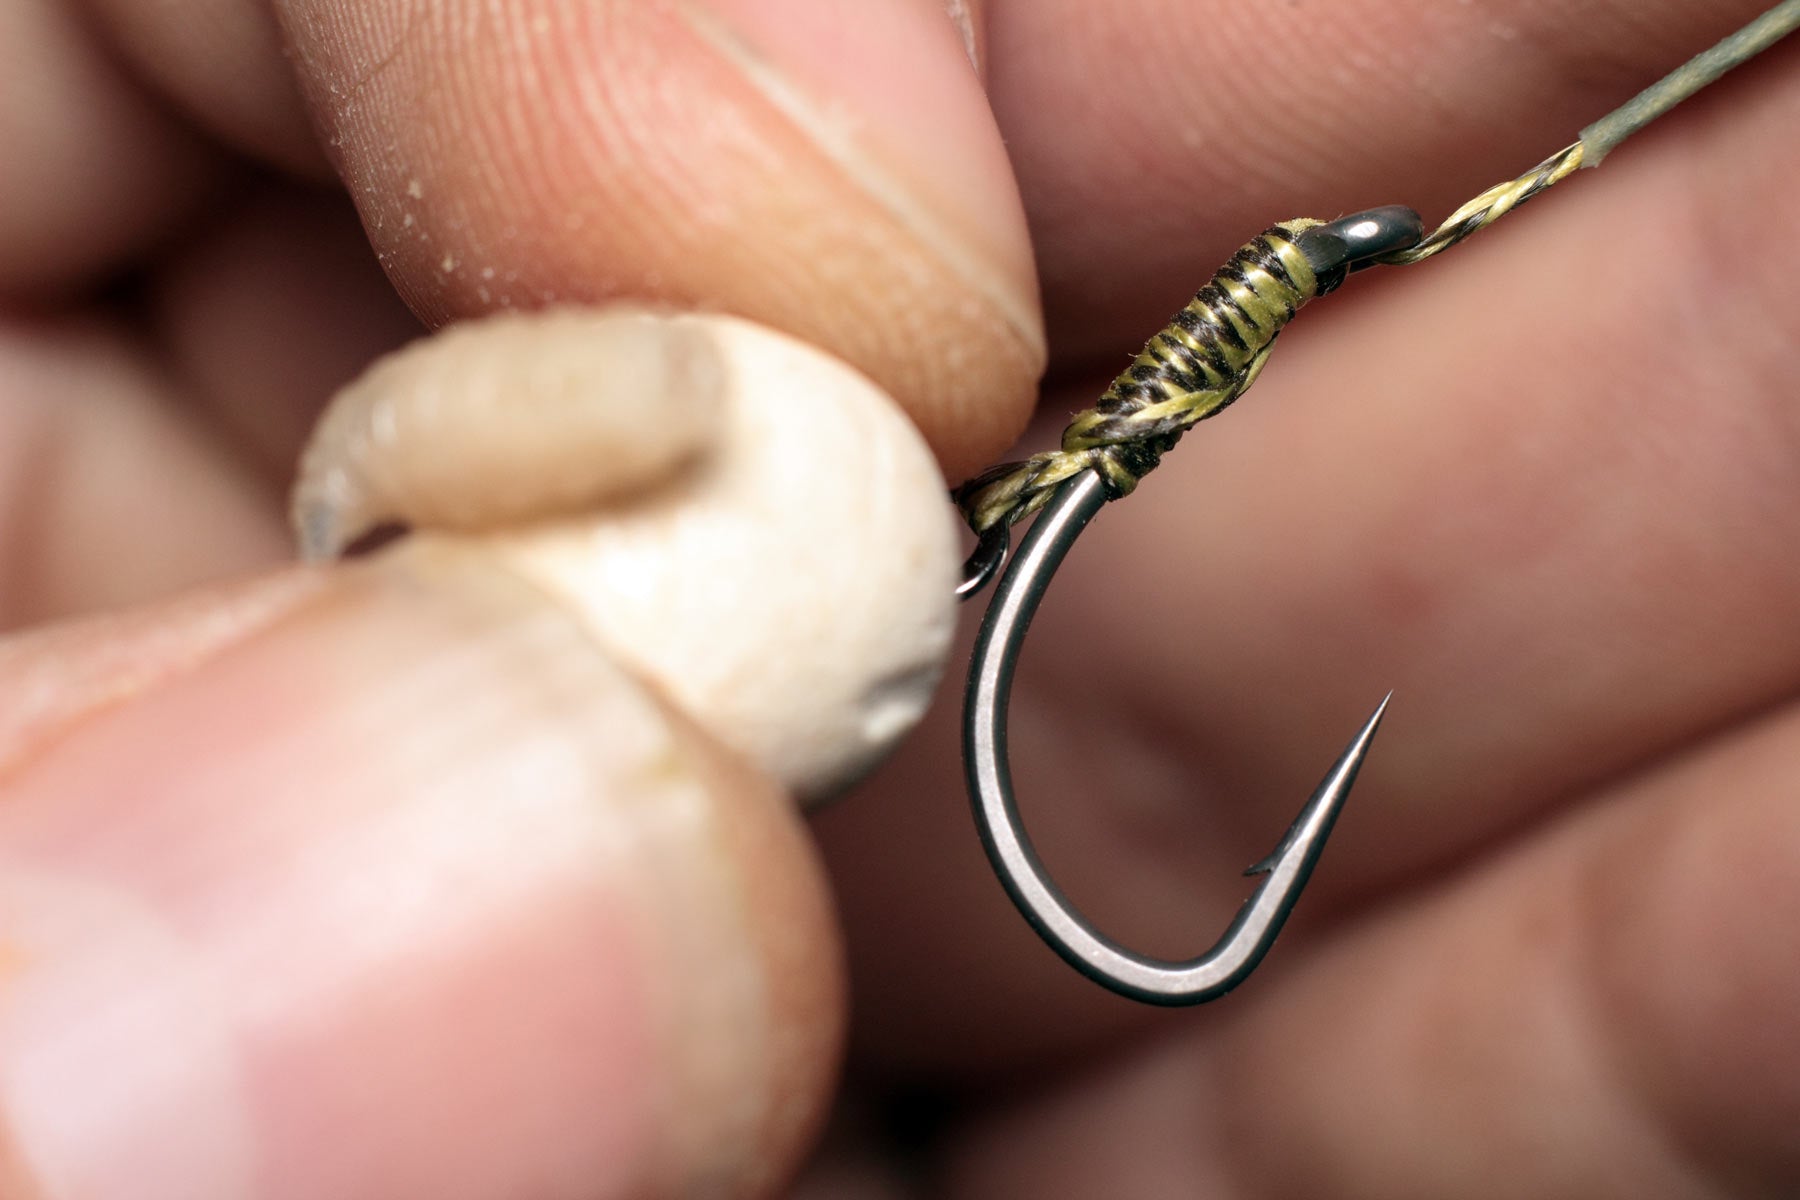
STEP ONE: Cut a 7 inch length of your chosen supple braid and feed one end through the eye of the hook, about half an inch will suffice.
STEP TWO: Using your thumb and forefinger trap the braid against the shank of the hook then whip up the shank around five or six turns.
STEP THREE: Feed the hooklink back through the eye and tighten down the knot.
STEP FOUR: Trim the tag end, then using your lighter carefully melt the remainder and blob it against the shank of the hook.
STEP FIVE: Take your line aligner and feed it onto the hook link and over the eye of the hook until it covers your knotless knot. If you're using a supple braid like we are then you will find it easier to load the aligner onto a fine baiting needle first.
STEP SIX: Now feed one of our mini rig swivels onto the hook followed by a shank stop. We want the shank stop to be positioned about opposite the barb.
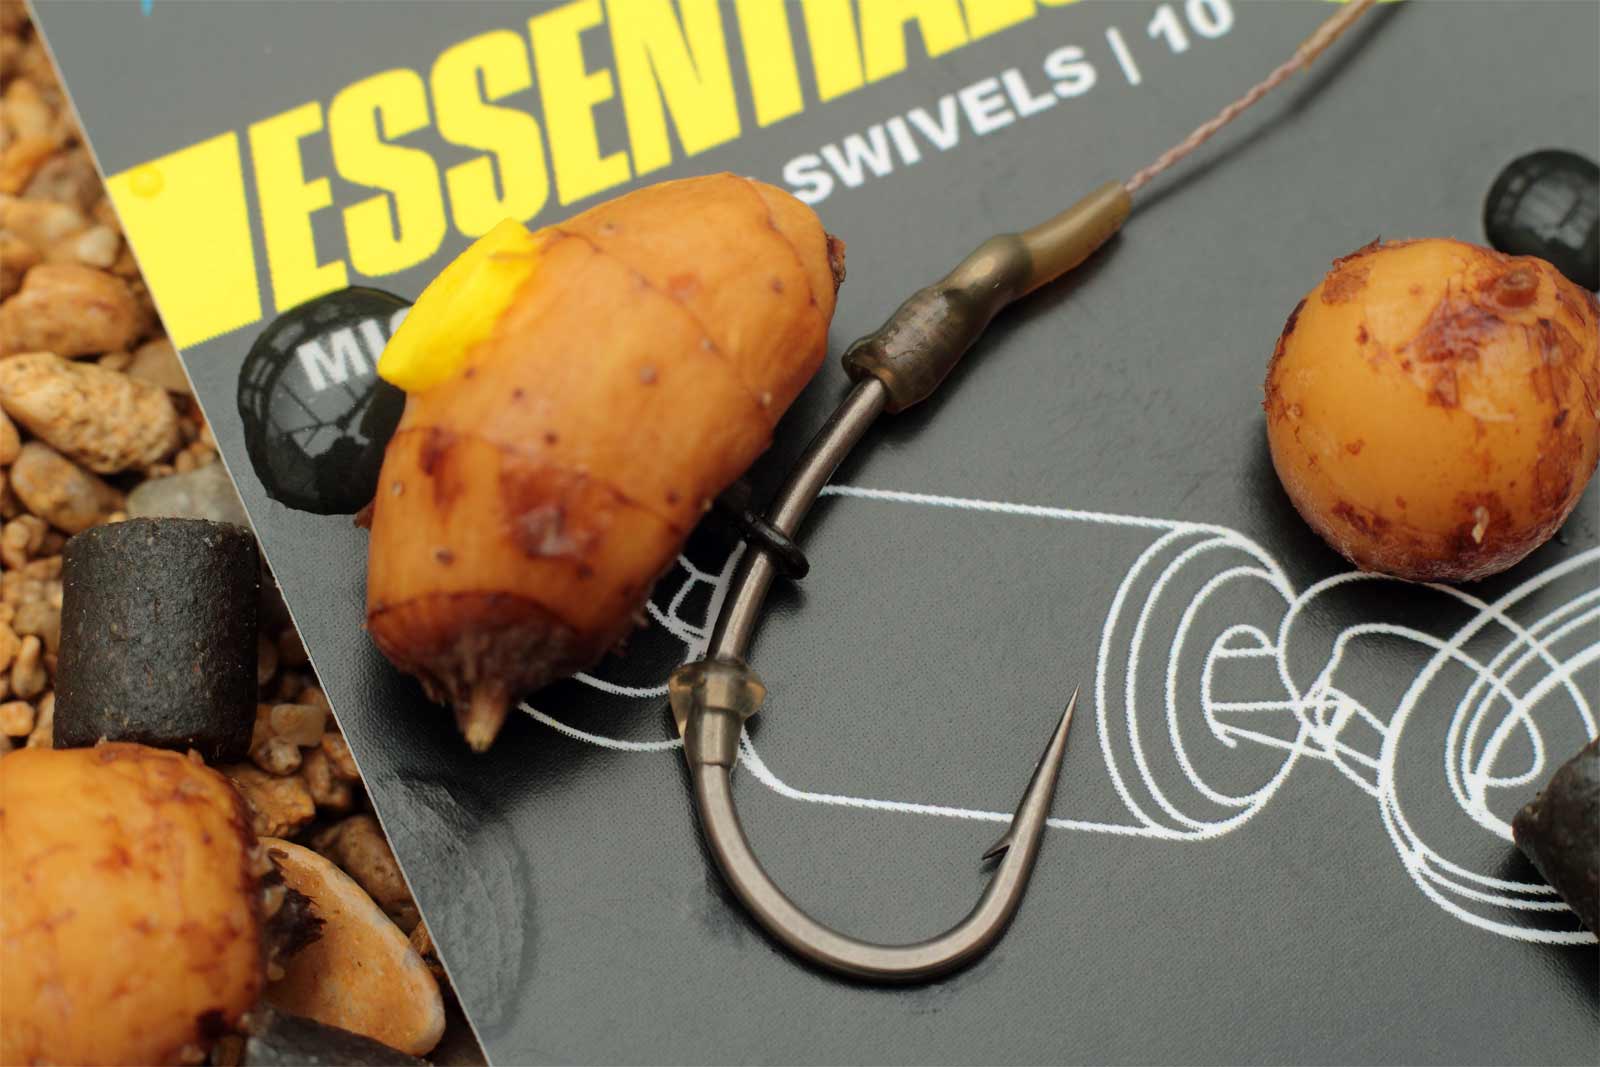
STEP SEVEN: With the rig tied it's now time to add the Tiger nut and balance it. Take your Tiger nut, a bigger one will be easier to work with. Using a 6mm bait drill bore a hole around 3 to 4mm deep.
STEP EIGHT: Take a length of our 6mm STICKUMUP Zig foam and locate it in the hole you just made in tigernut. When it's located cut it but leave four or five millimetres protruding (you'll need this for balancing later).
STEP NINE: Double up a length of braid/nylon or floss and position it on the mini rig swivel. Load the Tiger nut and foam onto a baiting needle and then transfer them onto the doubled over hair material. Slide the tiger nut down and locate it on the mini rig swivel. We want the body of the swivel to be inside the tiger nut. Don't trim the tag ends just yet..
STEP TEN: Next we want to balance the rig. Using a tub of water drop your rig into it. Trim away small bits of the Zig foam until the hook and bait sink slowly. We like to trim off enough so the hook just lays on its side with the tiger nut hovering just above. It's not critically balanced but the weight of the hook is somewhat negated.
STEP ELEVEN: With rig balanced as you want it, trim down the tag ends and use your lighter to melt and blog them down against the Zig foam.
The rig is now complete, it just needs attaching the appropriate swivel for your chosen lead arrangement.
A few tiger nuts predrilled and plugged with STICKUMUP zig foam glugging in a sweet liquid.
How to tie the Slip D rig - Carp rigs by Angling Iron
The Slip D rig is perfectly suited to using with a balanced bottom bait or wafter, the ‘D’ formed with supple braid on the back of the hook shank allows for great separation between the hook and hookbait making it a very tricky rig for carp to deal with.
What you'll need to tie the Slip D rig:
Some coated braid, a Semi stiff or Soft coated braid depending on the lakebed you’ll be fishing over. One of our Duropoint Anchor hooks in a size 4 or 5 along with one of our bait attachments, we'll be using a micro hook ring swivel but you can also use a rig ring screw or rig ring. You'll also want some of our large line aligners or 3:1 trans Khaki shrink tube if you’d rather.
Tools for the job:
Scissors, coated braid stripping tool, Knot puller and a lighter.
STEP ONE: Cut a length of your chosen coated braid, about 30cm will make a completed rig of around 6 inches in length and should be about right for most fishing situations.
STEP TWO: Using your coated braid stripping tool remove about 110mm of the coating from one end
STEP THREE: Now double over about 30mm of the exposed inner braid.
STEP FOUR: Feed the doubled over section through the eye so that it exits at the back, don’t feed it all the way through though, just enough so that the loop will pass over the bend of the hook.
STEP FIVE: Take your chosen bait attachment and slip it onto the looped section like so
STEP SIX: Now pass the loop around the bend of the hook and over the point until it is on the inside of the bend.
STEP SEVEN: Adjust the loop so that the micro swivel is about opposite the barb of the hook as pictured here.
STEP EIGHT: Trapping the loop and micro hook ring swivel in position, start to whip up the shank of the hook. Be careful to keep the doubled over section at the back of the shank whilst doing so, you might need to tweak it as you go along. Continue until you’ve whipped round the shank around eight or nine times.
STEP NINE: Whilst trapping the whipping you’ve just done to prevent it unravelling pass the coated end of the hooklink through the back of the eye like so.
STEP TEN: Pull the remaining hooklink through the eye and tighten down.
STEP ELEVEN: Now trim down the tag end and if it’s quite long, give it a lick with your lighter
STEP TWELVE: Take your large line aligner and feed it onto your hooklink, then moisten the eye of the hook and whipping with saliva before locating the line aligner.
STEP THIRTEEN: Cut a 3 inch length of coated braid or nylon, feed it through the micro hook ring swivel and double it over so that both legs are roughly equal.
STEP FOURTEEN: Trap the ends of the doubled over section in the baiting needle and transfer your bait onto the loop. Slide it down and locate on the swivel.
STEP FIFTEEN: Now light the tag ends until and use a wetted finger to blob the ends against your bait.
All that’s left to do is to attach the finished rig to the appropriate swivel, or just tie an overhand loop so you can attach it at a later time.
How to tie the Combi rig - A tweak on the classic carp rig
The Combi rig is a classic time served rig that has been the downfall of many big carp over the years. Traditionaly the rig will have a rig ring and hair on the back of the hook shank. With the more recent addition of Micro hook ring swivels to most anglers armoury we show you how to tie a Combi rig with a little tweak that we feel increases the effectiveness of the rig by allowing the hook and bait to move independently of each other.
What you'll need to tie the tweaked 'Combi rig' :
Some Fluorcarbon hooklink material, we prefer a 15/20lb B/S version. Some supple braid, 15/20lb bs will be ideal. Some of Our Duropoint Curve shank or Wide gape hooks and some of our Micro hook ring swivels.
Tools for the job:
Scissors, Lighter and knot puller tool
STEP ONE: Cut around 6 inches of your chosen supple braid hooklink and fold back around 1.5 inches at one end. Feed the micro hook ring swivel into the doubled over section and then tie an overhand loop to contain the swivel.
STEP TWO: Trim the tag end and using a lighter carefully melt and blob.
STEP THREE: Now feed, the braid hooklink through the eye of the hook, however unlike normal feed it through so the braid exits the back of the eye like below.
STEP FOUR: Now feed the micro hook ring swivel onto the hook, over the barb and round until level with the bend of the hook like so. (Note the braid is on the inside of the shank rather than the outside as would normally be the case)
STEP FIVE: Now whip your soft coated braid around the shank of the hook, anything between 5 -7 turns will be fine
STEP SIX: Now take around 9 inches of your fluorocarbon hooklink and fold over around 2 inches at one end like below, next pass the braided end section you created earlier through the doubled over section of Fluorocarbon. Make sure to get the hook as close to the fold in the fluorocarbon as you can, this will keep the supple end section of the finished rig quite small.
STEP SEVEN: Holding the hook and fluorocarbon loop between your left hand thumb and forefinger whip the supple braid around the doubled over section of Fluorocarbon. Between 5 and 7 Turns will be sufficient. Try to keep the whipping turns close together and fairly tight.
STEP EIGHT: Now whip back over the top of the previous whipping towards the hook, 2 or 3 turns will do the job nicely. Then pass the tag end back through the loop of the fluorocarbon.
STEP EIGHT: Moisten the knot, then tease it down with your thumb and forefinger. Once you've done this use your knot puller tool to fully tighten the knot
STEP NINE: Trim the tag end of both the Fluorocarbon and braid to about 5mm, then using a lighter carefully melt and blob them against the knot
Now all that's left to do is attach your chosen hookbait, we like to use a piece of doubled over fluorocarbon for the hair. and set the bait around 2mm away from the micro hook ring swivel as below. Then simply attach the other end of your rig to your swivel.
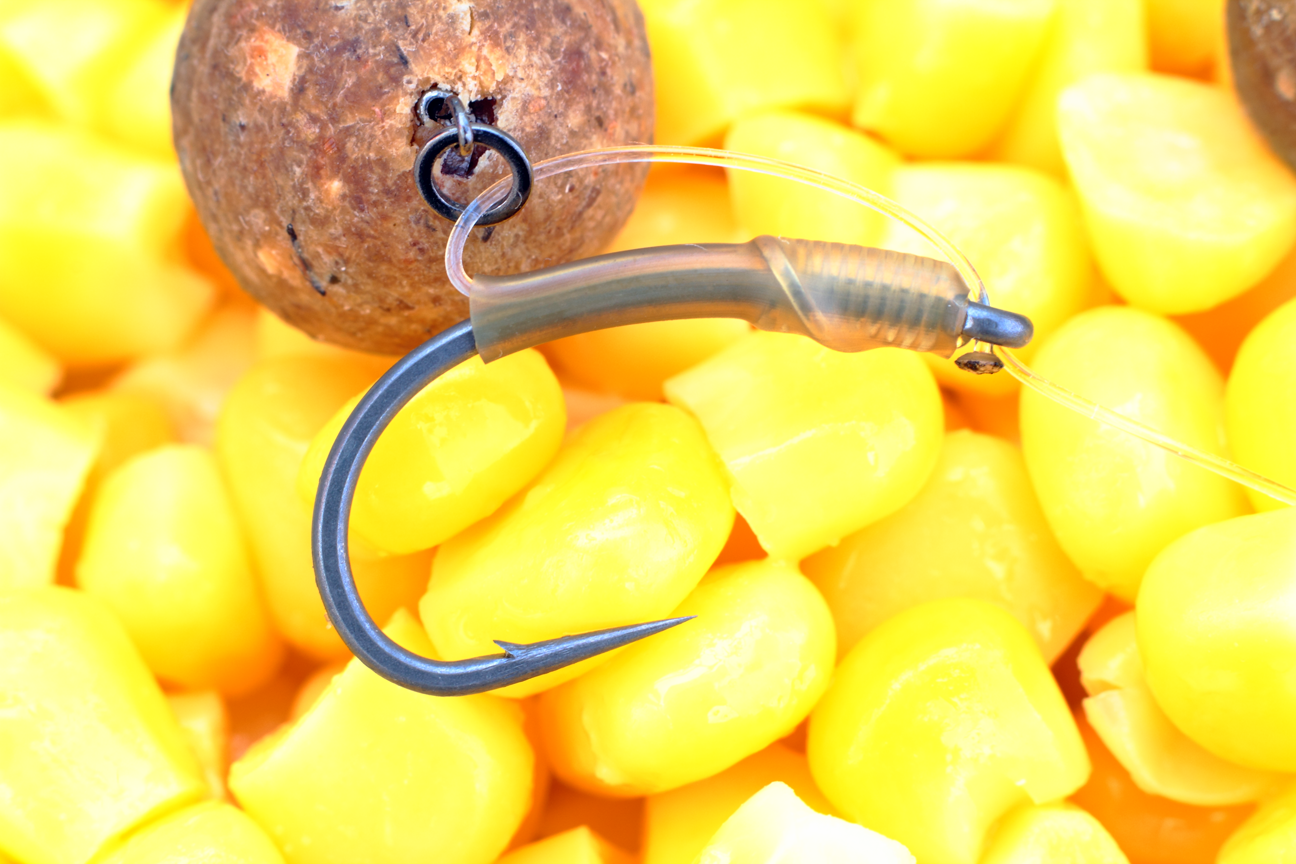
HOW TO TIE THE 'EASY D RIG' - IN NINE STEPS - ANGLING IRON
We've all seen how effective the D rig can be, it's a fantastic carp rig for use over a hard clean lakebed and gives excellent hookholds, the downside? it's a bit of a tricky rig to tie - If you've seen our video "how to tie the D rig" in the videos section and have decided its a bit too tricky then our 'Easy D rig' is much easier to tie up and is equally as effective at hooking big carp!
What you'll need to tie the 'Easy D rig' :
Some Fluorcarbon hooklink material, we prefer a 20lb B/S version. One of Our Duropoint Curve shank hooks(we prefer bigger for this rig) along with one of our Bait attachments, We'll be using a size 12 Rig swivel but you can also use a Micro hook ring swivel, Rig ring or Rig ring screw. You'll also need some of our British made 3:1 Trans khaki shrink tube.
Tools for the job:
Scissors, Lighter and a Kettle for some steam
STEP ONE: Cut around 10 inches of your chosen Fluorocarbon hooklink and pass around 1.5 to 2 inches through the eye of the hook so it exits at the back like so.
STEP TWO: Now we're going to create a knotless knot, by whipping the Fluorocarbon up the shank. We think seven times is ideal.
STEP THREE: Pass the main length of Fluorocarbon back through the eye of the hook from back to front and tighten. That's your knotless knot done.
STEP FOUR: Now cut a length of shrink tube to size (about 12mm for a Size 4 Curve shank is perfect) and pass it along your hooklink and onto the shank of the hook. We want to position it so that it’s just beyond the eye so that it does not impede forming the "D" later on.
STEP FIVE: Being careful not to burn your fingers it's time to steam the shrink tube down to size. The best way to ensure everything is lined up after steaming is to hold the fluorocarbon firmly at both ends whilst steaming.
STEP SIX: Now take one of your Size 12 rig swivels (or rig ring, hook ring swivel, baitscrew) and pass it onto the hair as shown below.
STEP SEVEN: With the rig swivel now on the hair fold it and pass it through the back of the eye to create the "D" section as below, make sure to pull the tag end right through to close up the D. Now trim the tag end to around 5/6mm.
STEP EIGHT: Making sure that your hooklink is well out of the way carefully use your lighter to light the remaining tag end and blob it quickly using a wetted finger.
STEP NINE:Your 'easy D rig' is nearly done, all that's left is to push the blobbed tag end upto the eye of the hook and shape your "D"
With your 'Easy D rig' (see, we said it was easy) all complete all that's left is to attach your bait and go catch some big carp.
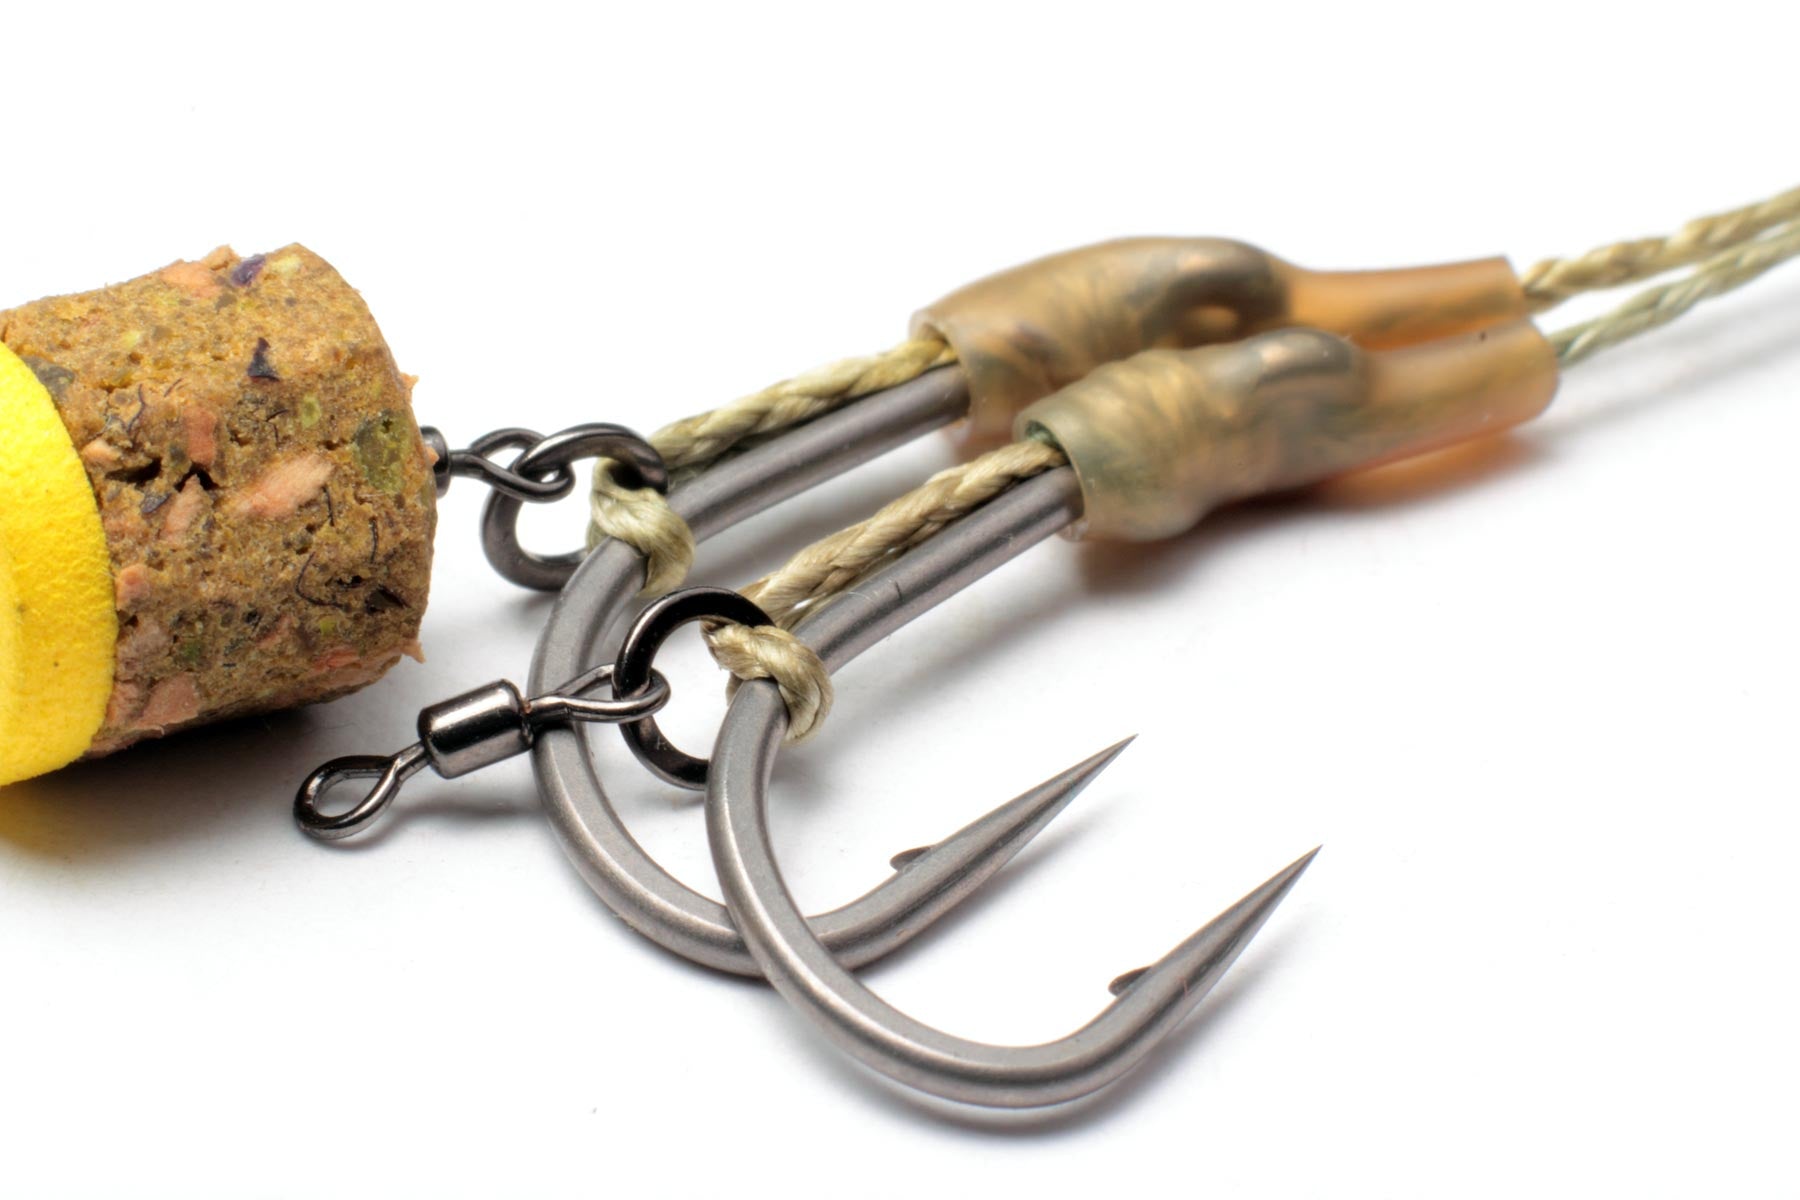
How to tie the Hinged Multi rig - In fifteen steps - carp rigs by Angling Iron
The Hinged Multi rig as the name implies is a hybrid of the Hinged stiff rig and the Multi rig. It's a neat and subtle rig that that offer the fantastic turning ability and the superb hooking potential of the Stiff hinged rig whilst gaining the convenience and adaptability of the Multi rig. Namely the ability to quickly change hooks and hookbaits very quickly. In this demo we'll show you how to tie a Hinged Multi rig like this one.
What you'll need to tie the Hinged Multi rig:
Some Stiff coated braid, One of Our Chod hooks, a size 12 rig swivel some of our khaki super shrink(optional) and one of our Bait attachments. We'll be using a Rig ring screw but you can also use a Micro hook ring swivel or Rig ring. You'll also need some tungsten putty.
Tools for the job:
Scissors, Knot puller and a lighter.
STEP ONE: To start with we're going to create the end section of the rig, the part that functions as the multi rig does. take a 5 to 6 inch length of your chosen stiff coated braid and double it over.
STEP TWO: Feed one of our size 12 rig swivels onto the double over section of coated braid and then create a fold in the coated braid, aim to make the looped end around 15mm in length as shown below.
STEP THREE: With the swivel in the fold we have just created we are going to tie a one turn grinner knot. Gripping the swivel between thumb and forefinger create a loop as shown below and take the two tag ends around the long loop and through the new loop. (You an do a couple more turns if you'd rather use a two or three turn grinner)
STEP FOUR: Pull on the tag ends to ease the grinner knot down fairly tight, then using your knot puller tool in the main loop tease the grinner knot down to the swivel. As you slide the knot towards the swivel this will increase the length of your Multi rig section which is why we specified starting at around 15mm
STEP FIVE: With your knot puller tool in the loop bed the grinner down tight onto the swivel. You may also need to pull on the tag ends to ensure the knot is fully tightened.
STEP SIX: With the multi rig loop created and the grinner knot tightened down, trim the tag ends down to around 5mm and using a lighter on a low flame carefully melt them down till they're close to the knot and use a wetted finger to blob them. The multi rig end section of your Hinged multi rig is now finished ready to take your Chod hook and bait mounting.
STEP SEVEN: Take your Chod hook, in this case one of our Size 5 Duropoint Chod's and pass the multi rig loop through the eye so it exits at the back of the hook, then add your chosen bait mount, here we use one of our micro hook ring swivels but you can use a rig ring, bait screw or even another Size 12 rig swivel.
STEP EIGHT: Pass the multi loop over the bend of the hook and then over the point so that the end of the loop is trapped on the inside of the bend as shown below. Then Holding the rig swivel pull the multi loop back through the eye of the hook until a fairly small "D" is created.
STEP NINE: I like to use a little shrink tube on my multi rigs to ensure the "D" doesn't close up too easily, however its not strictly necessary, particularly if using a thick coated braid that is snug inside the eye of the hook. So skip this step is you're not using a piece of shrink tube.
If you are using some shrink tubing pass it over the rig swivel and onto your multi rig end section until it just covers the eye of the Chod hook before steaming it down. The end section of the Hinged Multi rig is now complete. (Incidentally you can also use this end section in place of standard Chod rigs, with the advantage being you can easily change your hook over should you wish to)
STEP TEN: Take another length of your chosen stiff coated braid, it needs to be the length you want your finished rig to be plus around another 4 inches. Feed your finished Multi end section onto the stiff coated braid and double over around 1.5 inches
STEP ELEVEN: With the swivel in the fold of the doubled over section we have just created we are now going to create a simple overhand loop with the boom section, (you could equally use a figure of eight loop)
STEP TWELVE: Moisten the loop and tease it down towards the rig swivel, we like the finished loop to be fairly small and neat like shown below. Now trim the tag end to around 5mm before carefully melting and blobbing it with a lighter.
STEP THIRTEEN: Now we're going to form a nice round loop and steam it into shape. Take something with a round profile and pass it into the loop you have just created, a loop forming tool is great for the job but a small screwdriver will do the job equally well. Now with the tool still in place steam the loop so it holds its shape once the tool is removed.
STEP FOURTEEN: Take enough putty to balance your chosen popup. Roll it into a ball before squashing it into a small disc between your thumb and forefinger. Next press the knot of the overhand loop we just made into the putty before moulding the Putty neatly around the knot.
STEP FIFTEEN: That's your Hinged Multi rig just about done, all that's left is to do is steam the boom section nice and straight and attach it to the appropriate swivel for your chosen lead arrangement. I like to fish it on a helicopter setup so create a 2 inch long figure of eight loop at the other end of the boom section to attach to a size 11 Quick change heli ring swivel.
The finished Hinged Multi rig is a superb big carp rig that combines all the best attributes of the Stiff hinged rig and the Multi rig to create a real winner. The size 12 rig swivel and loop formed in the boom section with the putty placed on the knot means the rig is neat, subtle and very responsive, turning immediately and freely when sucked at by big carp.
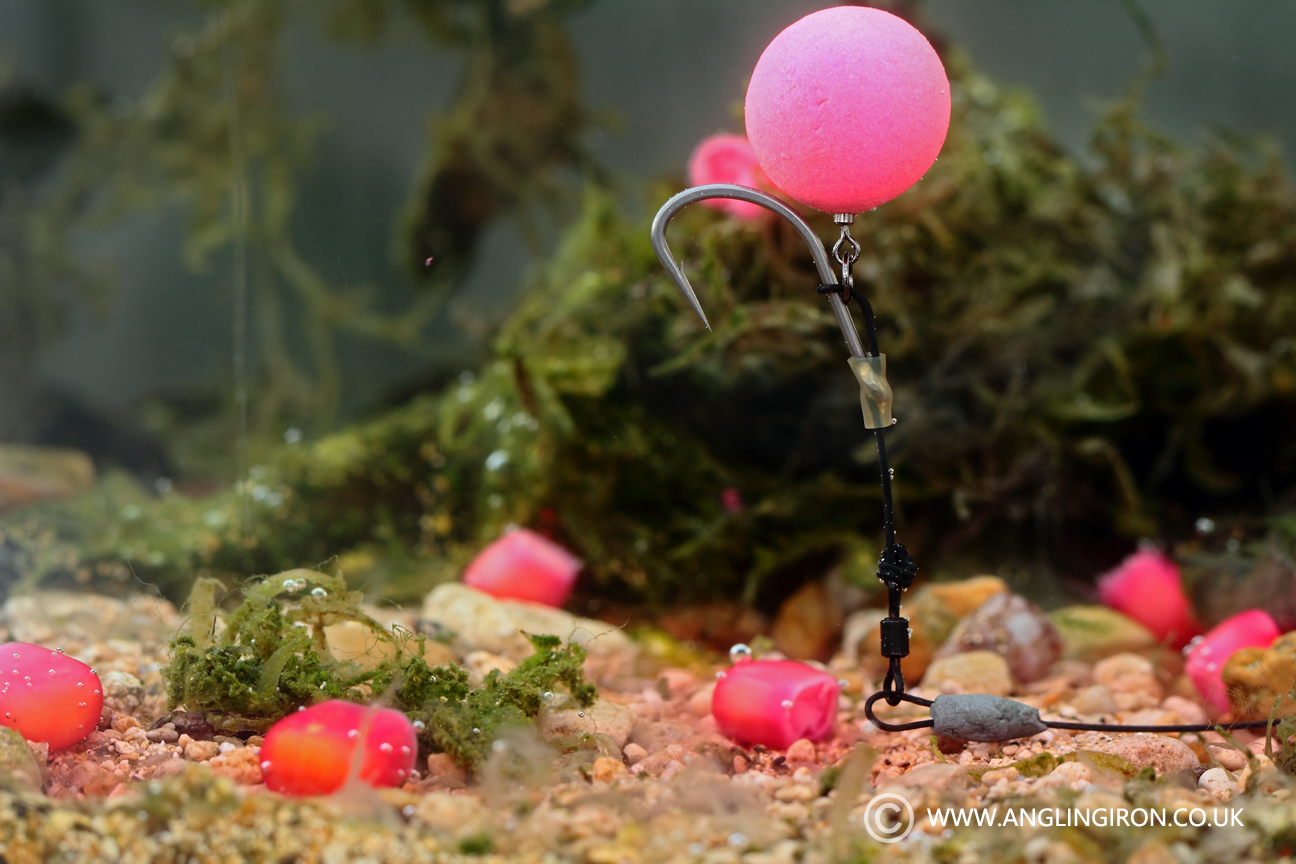
How to tie the Reverse Combi rig - in twenty steps
The reverse combi rig is a fantastic alternative to the Hinged stiff rig. Many anglers are looking for a subtle low sitting pop up rig hence the current popularity of the Ronnie rig. The reverse combi rig performs similarly to both the Hinged stiff rig and Ronnie rig but has the ability to be tied with very short end sections which has be presented very close to the lakebed if so desired.
What you'll need to tie the Reverse Combi rig:
Some of our REVOLVE™ Stiff rig filament, a coated braid, One of Our Duropoint® Chod or Curve shank hooks along with one of our Bait attachments, We'll be using a Micro hook ring swivel but you can also use a rig ring screw or Rig ring.
Tools for the job:
Scissors, Knot puller x 2 and a lighter.
STEP ONE: Take a 7 inch length of bristle filament & one of our Chod hooks, a Size 5 is perfect for 14/15mm popups pass the bristle filament through the eye so that there is around 40mm at the back of the hook.
STEP TWO: Clamping the 40mm length of B/F along the back edge of the shank of the hook with your Left hand( if you're right handed) use your right hand to start whipping the B/F up the shank of the hook going anti clockwise.
STEP THREE: For a Size 5 hook we recommend whipping up the shank around 8 or 9 times, For a size 6 hook, 7 or 8 and for a size 8 hook 6 or 7 times
STEP FOUR: Carefully adjust your grip to pinch the whipping you have just completed to prevent it unravelling. Now pass the long length of Bristle filament through the eye from back to front. Pull it all the way through then use your knot puller tool to tighten
STEP FIVE: Thread the Micro hook ring swivel onto the line at the back of the hook
STEP SIX: Now take the end of the line onto which you have just slid the micro hook ring swivel and pass it back through the eye from back to front. Pull it right the way through so that the "D" Is closed right up then trim the line where it exits the eye to about 5mm long.
STEP SEVEN: Using your lighter carefully light the tag end that you have just created and flatten it with your thumb before it reaches the eye of the hook, it may help to bend the rest of the line out of the way before you do so. With this done grab the micro ring swivel and use it to pull to "D" into shape.
STEP EIGHT: Now create a simple overhand loop in the bristle filament
STEP NINE: Tease down your overhand loop until it is almost but not completely closed up. The position of the overhand loop in relation to the hook will determine the height at which your pop up will sit above the lakebed. If you're after a really low sitting pop up rig then aim to get the overhand loop around 10mm from the eye of the hook. In our example the knot is around 35mm from the eye.
STEP TEN: Now take your length of coated braid and using your coated braid stripper tool remove around 60mm of coating from one end.
STEP ELEVEN: Now holding the hook section you made earlier in your right hand(assuming you're right handed) feed the stripped end of the coated braid through the overhand loop you created in the bristle filament. It is important to note the braid should go through the loop the same way the Bristle filament exits the loop(see below) it is also important to note that the entire section of bare braid has gone through the loop plus a couple of millimetres of the coated braid too.
STEP TWELVE: Holding both the bristle filament and coated braid securely just behind the loop with your left hand now you're going to whip the bare braid up the bristle filament towards the hook six or seven times with the right hand. We're trying to keep the whipping quite close together like so
STEP THIRTEEN: With the six whips up the bristle filament complete its time to whip back down over the top of these a couple of times towards the overhand loop and then through the overhand loop the same way as the coated braid and bristle filament. This is easiest if you pinch the uppermost whip and bristle filament between the thumb and forefinger of your right hand as below.
STEP FOURTEEN: Now put your hook on the Knot puller tool and grab the other end of the bristle filament with a pair of pliers and pull until the Overhand loop is completely closed up tight.
STEP FIFTEEN: Keeping the hook on the knot puller tool now it's time to tighten up the whipping. Take the long length of coated braid in your left hand and pull, the Mahin knot will start to tighten up. Its done once it cannot be tightened any further and has a conical shape.
STEP SIXTEEN: Trim the tag ends of the mahin Knot. Now fold the long coated braid out of the way and carefully use a lighter to blob both tag ends and extinguish with a wetted finger.
STEP SEVENTEEN: Now steam the bristle filament into the desired curve, we like a very slight curve on our reverse combi rigs.
STEP EIGHTEEN: Take the required amount of tungsten putty, roll it into a ball before flattening between your thumb and forefinger like so.
STEP NINETEEN: Take your rig and push the Mahin knot into the flattened Tungsten putty before moulding the putty into a pear shape around the knot like so.
STEP TWENTY: Job done, all that's left to do is to attach your rig to the appropriate swivel for the lead arrangement you'll be using and add your hookbait as below.